Configuring Telnet for CLI
The device provides an embedded Telnet server, which allows you to access its CLI from a remote Telnet client using the Telnet application protocol. By default, the Telnet server is
If you enable secured Telnet connectivity, the device uses the TLS security protocol, whereby information is transmitted encrypted (instead of in clear text). For TLS, the device uses the TLS settings of the TLS Context at Index #0 ("default"). A special Telnet client is required on your PC to connect to the Telnet interface over the TLS connection, for example, C-Kermit for UNIX and Kermit-95 for Windows. For more information on TLS, see Configuring TLS Certificates.
For security, some organizations require the display of a proprietary notice upon starting a Telnet session. To configure such a message, see Creating a Login Welcome Message.
To assign IP interfaces for Telnet sessions, see Configuring Telnet Interface.
| ➢ | To configure Telnet: |
| 1. | Open the CLI Settings page (Setup menu > Administration tab > Web & CLI folder > CLI Settings). |
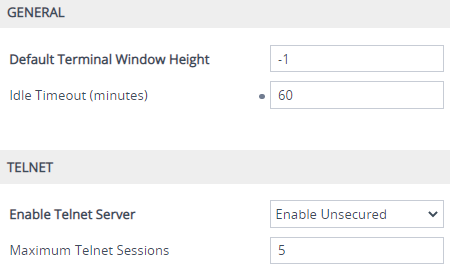
| 2. | In the 'Default Terminal Window Height' field, enter the maximum number of output lines to display in the CLI terminal window. |
| 3. | In the 'Idle Timeout' field, enter the duration of inactivity in the Telnet session after which the session is automatically terminated. |
| 4. | From the 'Enable Telnet Server' drop-down list, select Enable Unsecured or Enable Secured (i.e., TLS) to enable Telnet. |
| 5. | Click Apply, and then restart the device with a save-to-flash for your settings to take effect. |
For a detailed description of the Telnet parameters, see Telnet and CLI Parameters.